Tuesday, May 31, 2011

TWD—Caramel Pots de Creme

I made the Caramel Pots de Creme for this week’s pick for Tuesdays With Dorie EXACTLY as written (except I only made 1/4 of the recipe).  It made three small (cute little heart shaped) ramekins of creme. 

DSCF5341

The most annoying thing is that I thought I’d try covering the pan with the ramekins ready to bake with plastic wrap just as the recipe suggests, even though I knew many complained about the plastic wrap melting AND when we made the Chocolate Pots de Creme I didn’t cover it with anything and it was fine.  I should have just gone with my gut, but I wanted to see for myself if the plastic wrap did anything.

It melted.  By the time I checked on it part way through the baking, it was already melted quite a bit, so I didn’t think we should eat them.  So glad I only made 1/4 of the recipe!  I decided to taste one, so I scraped off a good part of the top layer of creme, sprinkled a few mini chocolate chips on top and tasted it. 

DSCF5348  It was good.  Probably not something I’d make again.  I really like the Chocolate version—better.  I was happy that the whole making caramel thing worked, even with such a small amount of sugar since the 1/4 recipe is so small. 

DSCF5334

I was able to peel this off the edges of the pan.  sigh  If you’d like to make this, Peggy from  Peggy the Baker chose the recipe and will have it on her blog. 

Caramel Pot de Creme-TWD 5-30-11

Is it just me, or anyone else find it really hard to believe June is here?  Totally crazy.  Now, if the weather here would just act like it’s springtime.  Actually, I think we’re finally done with snow, but now it just keeps on raining and it’s windy and cold.  Enough already. ;)

Saturday, May 28, 2011

Vegetarian Low Fat Spinach Artichoke Pizza Recipe

DSCF5325

This Vegetarian Low Fat Spinach Artichoke Pizza with Light Alfredo Sauce, Asparagus and Tomatoes is my new favorite thing!  (I forgot to take a picture of the whole pizza.)

I made homemade pizza for dinner tonight.  We do often.  The boys each get to make their own individual pizzas and I put out the different toppings.  All four boys have only put cheese on their pizzas.  Yet they will eat pepperoni right out of the package like crazy.  Silly boys!  I usually just make a pizza on the pizza stone for Kevin and I, but he decided to make calzones with all kinds of “things” inside that I wouldn’t eat. ;)  So I made my own pizza.  It will take me days to eat it, but it was so good, I probably could have eaten half the pizza in one sitting!

For the boys, I made a regular pizza dough with bread flour.  Then I made a whole wheat pizza dough, which is one I’ve made quite a few times that I found on Joe’s blog, Culinary In The Country.  I adapted the recipe just a little, instead of one cup whole wheat flour and one cup all purpose flour,  used 1  1/2 cups whole wheat flour and 1/2 cup all purpose.  This pizza dough is so easy as everything is made in the food processor and it makes a nice crisp whole wheat crust after rising for about an hour.

Spinach Artichoke Asparagus Pizza 5-27-11

Vegetarian Low Fat Spinach Artichoke Pizza, by Katrina, Baking and Boys!

1 recipe whole wheat pizza dough (or regular dough, enough for a 14 inch pizza)

1/2 cup jarred Light Alfredo Sauce (I used Classico)

3 cloves garlic, finely chopped

1 tablespoon extra virgin olive oil

2 cups chopped fresh spinach (or more)

about 1/3 lb. fresh asparagus, cut on a diagonal in 1/2 inch size pieces

1  14 oz. can quartered artichoke hearts (I used about 3/4 of the can, add according to taste)

1 medium tomato, chopped

1 cup finely shredded mozzarella

1/4 cup finely shredded parmesan cheese

1-2 tablespoons chopped fresh basil

cornmeal, for sprinkling on the pizza stone

Make pizza dough, let it rise for about an hour .

Preheat oven to 425 degrees.  Preheat a pizza stone. Heat the olive oil in a 12-inch non stick skillet over medium heat.  Add the spinach and asparagus and saute for a minute or two.  Add the garlic and artichokes and saute for another 30 seconds or so.  Remove from heat and let it cool while you roll out the pizza dough.  Remove the stone from the oven and place the rolled out dough on it.  Spread the Alfredo sauce evenly over the dough.  Scatter the spinach mixture evenly over the sauce. 

Sprinkle both cheeses over the vegetables.  Then scatter the chopped tomato over the top.  Bake the pizza for 10-15 minutes (checking it every minute or two after 10 minutes).  Remove the pizza from the oven and sprinkle it with the chopped basil.  Slice with a pizza cutter. 

_________________________________________

I can hardly wait to have another slice of this pizza!

Here’s Kevin’s two calzones he made.  One was full of pepperoni, green peppers, jalapeno, cheese, etc. and the other had some leftover chicken fajita mixture with black beans, cheese, etc.

DSCF5322

 DSCF5321

  __________________________________________

Sam had his last day of preschool for the year.  We snapped a quick picture with his teacher, Mrs. Clark.

DSCF5288

The other boys are counting down, four more days of school next week until they’re done!  Their last day of school will be Scott’s 13th birthday.  Oh boy, are we ready for a teenager?

Thursday, May 26, 2011

Cherry Chocolate Chip Ice Cream Recipe

Cherry Chocolate Ice Cream 5-25-11

I did it.  I FINALLY (ha) got out the ice cream maker after months and months of it collecting dust in the cupboard.  Cherries are starting to show up in the store, so I recently bought a pound or two and decided to make this Cherry Chocolate Chip Ice Cream.  It’s perfect.  The cherry flavor is just right and the little pieces of dark chocolate speckled throughout are always a welcome touch to any ice cream, if you ask me. ;)

I did some hunting around on the internet for recipe ideas for the ice cream and decided on Elise’s Cherry Ice Cream with Chocolate Chips from Simply Recipes.  I adapted Elise’s recipe quite a bit, but most of the ingredients are the same amounts, so props to her.

One thing I did that she didn’t do in her recipe that I’m really glad I did was strain the warm milk and cherries.  I don’t care for bits of frozen fruit in my ice cream, though I love the flavor fruit gives.  Kevin came home from work and mentioned how he really dislikes chunks of fruit in ice cream (I already knew he doesn’t like fruity ice cream anyway, so this one wasn’t for him in the first place).  But it’s nice that this has no pieces of cherry skin and whatnot leftover after the warm milk and cherries went through the blender. 

For my own thrills, I used fat free milk for the milk and did use cream—therefore, the fat free cancelled out the cream.  Right?  Hello?  Anyway, like I said, this cherry ice cream has the perfect flavor and chocolate in every bite.  It was super easy to make, so you should give it a try.

Cherry Chocolate Chip Ice Cream, by Katrina, Baking and Boys!

12 ounces (3/4 lb. or about 1  1/2 cups) ripe sweet cherries, pitted

3/4 cup fat free milk

1  3/4 cups cream

1/2 cup granulated sugar

pinch of salt

2 teaspoons lime juice (or lemon)

1/4 teaspoon almond extract

3 ounces good quality dark chocolate, chopped and melted*

6-10 drops of red food coloring (Optional—I thought it looked a little drab before adding a little touch of color)

Put cherries, milk, one cup of cream, sugar and salt into a medium sized saucepan.  Heat until the mixture is just barely forming bubbles around the edge over medium heat.  Reduce the heat to low and let sit for 15 minutes.   Remove from heat.  Pour the mixture into a blender and puree, being careful since the liquid is hot.  Make sure the lid is on the blender well and hold it down while it’s blending.  Strain the mixture through a fine mesh strainer into a medium sized bowl and discard the bits remaining.

Stir in the remaining cream.  Put the bowl in a large bowl filled with ice and water for about 30 minutes, stirring every 5-10 minutes.  This will quick chill the mixture.  You can also put it in a covered container in the fridge for a few hours.  I always do the quick ice bath.

Stir in the lime juice and almond extract and whisk to combine.  Pour mixture into bowl of ice cream maker and churn according to manufacturer’s instruction, 20-25 minutes.  During the last five minutes of churning, drizzle in the melted chocolate (*20 second intervals in a microwave safe bowl in the microwave, stirring in between each until melted and smooth, then let it cool slightly).  Put the ice cream in an airtight container and freeze for a few hours (or longer).

DSCF5299

Tuesday, May 24, 2011

TWD—Oatmeal Nutmeg Scones With Apricots and Pecans

TWD--Oatmeal Nutmeg Scones w/pecans and apricots 5-23-11

We made scones this week for Tuesdays With Dorie.  Patricia from Life With a Whisk chose the recipe and she’ll have the recipe on her blog.  I really like scones.  Unfortunately, I’m the only one around here who does.  I know I could have froze some of the unbaked scones and I should have, but they just all nicely lined themselves up on the baking sheet, so they all got baked.DSCF5248

Twelve perfect looking scones with some unique ingredients like oats, buttermilk, pecans, apricots and a touch of nutmeg.  I added half a cup of toasted pecans and chopped dried apricots.  I brushed them with some cream and sprinkled turbinado sugar on top before they baked.   

 Oatmeal Nutmeg Scones 5-23-11  

I tasted one of the scones and thought they still just needed a little more touch of something sweet.  A little white chocolate drizzle was the perfect thing.

DSCF5267

I liked these enough that I had the boys take a plateful of them to the neighbors.  Great pick for this week.  You just can’t go wrong with scones and these were really easy to make.  A link to all the other scones at TWD today.

Wednesday, May 18, 2011

Dulce de Leche Brownies

It was Kevin’s sister, Cindy’s birthday yesterday and her daughter told me she likes all things caramel.  I made her a few treats that showcase caramel.   I made David Lebovitz' Dulce de Leche Brownies.  These caramel swirled brownies are all you can imagine they would be since they are David’s creation and since their super rich fudgy texture is practically swimming in dulce de leche.

DSCF5203

Dulce de Leche Brownies (Caramel Swirled Brownies), by Katrina, Baking and Boys!, adapted from David Lebovitz

1/2 cup unsalted butter, cut into pieces

6 ounces good chocolate, chopped (I used a 60% cacao chocolate)

1/4 cup unsweetened Dutch-process cocoa powder

3 large eggs

1 cup granulated sugar

1 teaspoon vanilla extract (Oops, I forgot it!)

1/2 teaspoon sea salt, plus a little more for sprinkling the finished brownies

1 cup all purpose flour (140 grams or 4  7/8 ounces—per DL—I measured out 140 grams)

1 cup Dulce de Leche (Nestle canned Cajeta)

Preheat oven to 350 degrees.  Line an 8x8 inch square pan with non-stick foil with enough foil to hang over the edges.  Spray with cooking spray.  Set aside.

Melt the butter in a medium sized saucepan over medium heat.  Once melted, add the chocolate and whisk until fully melted and incorporated.  Remove from heat and whisk in the cocoa powder until smooth.  Add the eggs one at a time, then stir in the sugar, vanilla, flour and salt.

Add half the batter to the prepared pan and spread evenly.  Drop half the Dulce de Leche, evenly spaced, over the brownie batter, then swirl it with a knife.  Spread** the remaining batter over the caramel layer (**or as I do, put the rest of the batter in a plastic zip top bag, snip off about 1/2 inch in one corner and pipe it evenly over the caramel until it’s all used.  Drop the remaining Dulce de Leche in spoonfuls over the top and swirl it in the batter with a knife. 

Bake for 35-45 minutes (mine took 35 minutes).   A toothpick inserted in the center will come out almost clean.  Sprinkle the brownies with some sea salt, if desired.  Cool completely on a wire rack.  Chill the brownies for a few hours.  Cut into bars.

DL's Dulce de leche Brownies 5-17-11  

These are quite the ultimate brownie!

Tuesday, May 17, 2011

TWD—A Tragic Story About Maple Cornmeal Drop Biscuits

DSCF5107

They look good, don’t they.  Well, this is the sad story with a tragic ending to six poor little, short-lived Maple Cornmeal Drop Biscuits that are this week’s pick for Tuesdays With Dorie, chosen by Lindsay of A Little Something....Sweet!

I made half a recipe which made seven lovely, perfect cornmeal biscuits with a hint of sweetness from the maple.   They were super simple to make with everyday cornbread/biscuit ingredients.  The only thing I used different from the recipe is I used 2% milk instead of whole milk. 

After the biscuits baked and cooled just slightly, I prepared one for its photo shoot and some tasting. 

DSCF5113-1  

Ooh, looking good.  Work it baby, work it. ( The photo shoot was going splendidly.)

DSCF5114-1

Oh yeah, show us what you’re made of, Biscuit.  Nice.  A little sweetness and you’re done with a drizzle of maple syrup.

DSCF5117-1

It was a great photo shoot.  And the biscuit tasted great, too.

I tucked the other six away in an airtight container so they could be eaten that evening for dinner with some chili I made.  Minutes before we sat down to eat, I threw them on a baking sheet in a hot oven to warm them again as Dorie suggested in the recipe.  We ate chili and whatever other things I’d prepared for dinner.  Finished, cleaned up and dinner was a done deal.

Then it just all the sudden hit me—the biscuits were still in the  warm oven (that had been turned off, but was still quite warm)!!  I pulled the brown hockey pucks out of the oven.  Unless anyone likes eating rocks, these were destined to their permanent home in the trash.  sigh  Well, pooh.

I am sure worse things have happened and I am glad I at least got to taste the one lucky one and it was good.  So that’s it.  Tragic, I know. ;)

I’m sure there were a lot more successful biscuit stories out there in TWD Land.

________________________________________________

Some cute pictures will make up for it.  On Saturday, Sam decided to make “tickets” for us to be invited to a picmik he was planning.  Taylor, Parker and I all were invited.  Taylor got in on the food planning and he and Sam did it all themselves.   They even made peanut butter sandwiches and picked out all the crackers and things to go with it and there we were at 10 a.m. on Saturday having our picmik lunch outside.  It was a beautiful day and we had just “hiked” up to the water tower near our house.  It could not have been more cute to hear Sam keep saying picmik over and over. 

DSCF5160

DSCF5161

DSCF5162

You can see the water tower with the white top in the distance there.  I have hiked up to it many times and Parker and Scott have, too.  But for the first time, Taylor and Sam went with me, as well as Parker (Kevin was on a Boy Scout camp out with Scott).  The little guys did just fine and it was some great little exercise for the day.  Sam was so proud to have made it up to the tower. 

That night, we roasted marshmallows at the kitchen stove and made s’mores.  It was a big mess, but the boys loved it.

DSCF5157DSCF5158-1 DSCF5156-1The s’mores were so messy that they thought it was fun to make what they were calling s’mores salad on their plates and eating it with a fork.  Whatever works, huh!

Okay, that’s all.

Monday, May 16, 2011

Raspberry Cream and Chocolate Tart and Easy Melted Butter Chocolate Chip Cookies—The Secret Recipe Club

Here we are again.  This is so fun.  We were assigned another blog for The Secret Recipe Club.  (You can still join anytime.  Just click on the link and join in the fun.)  I had a lot of fun with this month—first off, I was given the phenomenal Holly’s blog, PheMOMenon.  She’s a fellow Utahn who I stupidly haven’t even met yet (we’re both really busy moms!).  Holly also blogs along with Tuesdays With Dorie, but she is also involved with French Fridays With Dorie (I’ve kind of had to let that one go!), and a number of other baking groups.  Let’s just say—her blog is delicious! 

DSCF5133

Last year, maybe August or September, I saw Holly on a segment of a local news show, Studio 5, where she made this tart.  You can check out that actual spot of her on Studio 5 here!  I recall when she made the tart how good I thought it looked and I vowed to make it sometime.  Fast forward to The Secret Recipe Club here and it was the perfect opportunity for me to get it done!

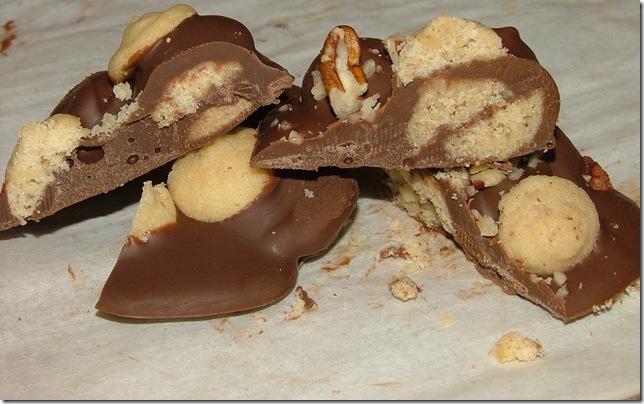
Now here’s where I say the tart is fantastic.  It’s so good.  Phenomenal.  And I really mean it.  I’m not saying it to be nice (because I’m just not that way—jk).  But this is so tasty.  I mean, Kevin has eaten a lot of it, like possibly half of it and THAT really says something because 1) he doesn’t like cake (and the crust for this is really more like cake), 2) he’s always claimed he doesn’t like fruit with chocolate.  This tart has raspberries, chocolate, a great cakey type crust with ground almonds and what I think makes this all pull together so well—almond extract.  Almond + chocolate + raspberries = a perfect combo.  We will for sure be making this again, Holly, so thanks!!!

As I said, the tart crust is more like a thick cake batter.  It was easy to spread into the tart pan, no rolling, no making sure it went perfectly up the sides of the pan—just spread it out.  Easy.

Chocolate is scattered over the batter, then fresh raspberries.

DSCF5119    

A simple sour cream filling is drizzled over the chocolate and raspberries and the tart is baked.

DSCF5123

A little more almond extract is added to the filling.  You can also add some orange zest and cinnamon for a little added flavor, but I left those out. 

DSCF5125

The tart is supposed to bake for 35-38 minutes.  I kept thinking the filling wasn’t done enough, so I ended up baking mine for 40 minutes.  The outside edges of the crust are a little too done, but it was still de-lish.  I think it was probably done at 35 minutes.  After the tart is cooled, it gets a little dusting of powdered sugar AND some chocolate curls for a finishing touch.

DSCF5136

Did I mention that this is really good?

DSCF5152

You can get the recipe on Holly's blog.  The only things I did differently from Holly’s recipe is omit the orange zest and cinnamon.

___________________________________________________

Just for fun while I was looking through Holly’s blog, even though I knew I was going to make this tart, I went back to see what her very first post was in January 2008 (she started her blog just a month before I started mine).  I thought it would be fun to make that first recipe she chose, whatever it was and to my delight, it was chocolate chip cookies!  So, of course, I made those, too!  I actually made them a week or so before I made the tart.  How could I not just whip them up, Holly calls them Easy Chocolate Chunk Cookies?

This was a recipe she got from the Food Network website.  I was pleasantly surprised to really like the cookies because the first thing I noticed was that they are made with melted butter and for some reason the cookies I have tried making with melted butter have not been my favorites, some have not even turned out well.  These were great!  I did make some adjustments to this recipe.  I played just a little with the amounts of sugars and flour because I do think our slightly higher altitude affects cookies.  This recipe is actually quite similar to the Nestle Toll House original chocolate chip cookie recipe, but it uses melted butter.  These were just the right crispiness on the outside and perfectly chewy inside.  Next time I make them, I will use a good, high quality chocolate, my favorite being Ghirardelli 60% cacao chips.  I used Nestle semi sweet chips this time, as that is what I had.

DSCF5097

Easy Melted Butter Chocolate Chip Cookies, by Katrina, Baking and Boys!, adapted from Holly at PheMOMenon

1/2 cup unsalted butter

2/3 cup dark brown sugar, packed*

2/3 cup granulated sugar*

2 large eggs

1 teaspoon vanilla extract

2  1/2 cups all purpose flour (300 grams)*

3/4 teaspoon baking soda

3/4 teaspoon salt

12 ounces chocolate chips

*The original recipe uses 3/4 cup brown sugar and granulated sugar and 2  1/4 cups flour, for non-high altitude baking.

---This recipe is easily made with a bowl, whisk and wooden spoon—no mixer needed.

Preheat oven to 375 degrees.  Line two baking sheets with parchment paper. 

Melt the butter in a small saucepan on the stove over medium heat (or in a microwave safe bowl in the microwave).  Cool for 5 minutes.  Whisk together the butter, sugars, eggs and vanilla in a large bowl.  In a medium sized bowl, whisk together the flour, baking soda and salt.  Stir the dry ingredients into the wet ingredients with a wooden spoon, just until combined.  Stir in the chocolate chips.

Using a cookie scoop, or about 2 tablespoonfuls (1  1/2 ounces each), drop the dough onto the baking sheets spacing them about 2 inches apart.  Bake for 12 minutes.  Transfer the hot cookies to a wire rack to cool.  Makes about 18 cookies.

_______________________________________

Check out all the other blogs in The Secret Recipe Club this month on the link below!


Sunday, May 15, 2011

Cookie Chips Chocolates for National Chocolate Chip Day

DSCF7725

While thinking about just how to “celebrate” National Chocolate Chip Day (Sunday, May 15), I was reminded of these fantastic Cookie Chips Chocolates that I made almost 3 years ago after seeing and hearing about their creation on Rita’s now quiet, but still readable blog, Clumbsy Cookie.  Sure miss her blog but it’s a good thing we’re friends on Facebook and still say hi and stuff once in a while. ;)

DSCF7745

Rita had the most brilliant idea to make little, bitty cookies the size of chocolate chips.  Then enrobe them in chocolate—therefore, making Cookie Chips Chocolates.  Not long after she posted about them, I just HAD to make them.  They are so fun, so good and so worth it!  (Your hand will tire from piping out the cookie dough in a piping bag fitted with a small round tip, but the recipe will make millions of fun little cookies. (If I recall, the recipe made three sheets full like this one.  Make the cookies and use what you need to, then freeze the rest for use another time.  (Rita has the simple cookie recipe on her blog at the link, I don’t think you could just use any cookie recipe as she perfected these so they don’t spread and stay in their perfect little chip shape.)

  DSCF7722

DSCF7737

I made some with the “plain” cookie dough, but I also made some with ground pecans in the dough as well as pecans throughout the chocolate and sprinkled on top.  I’m telling you, these candies are just terrific.

You know you’re dying with the cuteness and deliciousness of seeing these.  They would make such a fun gift all bundled up with cute wrapping and ribbons.  That’s it, I’ve convinced myself to make them again very soon.  I even have another idea.  Stay tuned!

Doesn’t matter what kind—go have yourself some chocolate chips today—or some Cookie Chips Chocolates, you cannot go wrong with either!

Wednesday, May 11, 2011

Crispy Chocolate Peanut Butter Marshmallow Topped Brownies

DSCF5065

The title for these is a mouthful, but it seems necessary not to leave out any of the description for such a tasty brownie.  I have seen these Crispy Chocolate Peanut Butter Marshmallow Topped Brownies for years now and all over the internet.  I was looking for something easy to make last week when we had company over and something made me think of these.  I was pleasantly surprised when I found out I already had everything to make them.

Don’t let the title make you think these are too involved or difficult to make.  I don’t normally use boxed mixes, especially for brownies, since I have a favorite easy homemade brownie recipe, but I was SO tired when I needed to make a treat last week and when I looked in the pantry and saw a box sitting there, it just had to be done.  I worked almost non-stop for two days cleaning the house (there is A LOT of house here!!!).  My parents came for a visit on Friday.  It was so good to see them—though I would have preferred a bit longer visit.  They were not even here for 24 hours!  But they hadn’t seen our new house since we’d moved in, so I wanted it to look really nice.  We took care of important things though—I whooped Mom in a game of Scrabble, so all is good. ;)  After they left on Friday, we also had more company on Saturday—a number of friends from when we lived in Arizona came over for lunch.  It was so good to see everyone!

These brownies are one of the things I had made for dessert.  So let’s get back to the brownies.  Everywhere I looked online for “marshmallow brownies” or “Rice Krispies brownies”, I came across some type of version of these.  I settled on following a recipe I adapted from none-other-than Anna’s blog, Cookie Madness.  She always has the best recipes! ;)

Peanut Butter Rice Krispies Marshmallow Topped Brownies 5-11-11 

 Crispy Chocolate Peanut Butter Marshmallow Topped Brownies, by Katrina, Baking and Boys!, adapted from Cookie Madness

1 family size box of brownie mix (follow the instructions on the box to make the brownies)

10.5 ounce bag of mini marshmallows (4 cups)

1  1/3 cups semi sweet chocolate chips

1 cup creamy peanut butter

3 tablespoons butter

2 cups Cocoa Krispies (regular crisp rice cereal works, too)

Preheat oven to temperature directed on brownie package, probably 350 degrees.

Line a 13×9 inch pan with non-stick foil.  (Or regular foil, lightly sprayed with cooking spray.)

Prepare brownies using amount of oil, eggs, water called for on box. Two minutes before they are supposed to be done (mine baked for 26 minutes), pull brownies from the oven and sprinkle marshmallows across top. Return to oven for 3 minutes, until they are puffed up.  Let cool completely on a wire rack.

Prepare topping. In a microwave-safe bowl, combine chocolate chips, peanut butter and butter. Heat on high in 30 second intervals,  stirring after each time until chocolate is melted together with the peanut butter and butter and is smooth. Add cereal and stir to coat. Drop spoonfuls of chocolate mixture over marshmallow layer, spreading as evenly as possible.  Chill the brownies in the fridge for a few hours.

Remove from pan using the foil edges, peel off the foil and cut into squares on a cutting board.  Cut into 24 squares. 

_____________________________________

Everyone loved these.   Next time I make them, I will use my homemade brownie recipe, which will kick them up even more.  They are definitely super rich and could be cut into even smaller pieces that could each be set in small cupcake or candy liners. 

Tuesday, May 10, 2011

TWD—Brown Sugar Bundt Cake

DSCF5088

Heeerrrree we are again.  I swear Tuesdays come around faster than any day of the week! ;)  It’s Tuesdays With Dorie time.  Our recipe this week for Brown Sugar Bundt Cake was chosen by Peggy from Pantry Revisited.  She’ll have the recipe!

I decided to make half a recipe and bake it in an 8x4 inch bread pan.  Small problem, my fault.  I added too many extra mix-ins to it and I think it caused a big sink hole in the middle of the loaf.  I made the nut version of the cake and used almond meal and slivered almonds.  Then I decided to add some chopped chocolate and toffee bits (1/2 cup each).  So while the taste of the cake is great, it wasn’t pretty.  Should I show you?  You know, sometimes we all have kitchen failures. 

DSCF5075

Well, you might be thinking how that sinking thing happens to all of us at one time or another.   I’m pretty sure this really just happened because the batter/cake was too weighed down with extras.  Then this happened, too---

DSCF5076

Half the cake stuck to the bottom of the loaf pan—pretty much because the toffee made it extra sticky.  Sigh.

Oh well, you can’t win them all, right.  As I mentioned, the flavors were great with the hint of almond extra playing well with the crunchy almonds and the added chocolate.  While I love toffee, I wish I would have just left it out of this one.  I’m going to have to freeze “slices” of this because I don’t want to keep eating it.  We’ll see how the next day goes and if anyone else has enough to just let them eat it to get rid of it.

Cutest photos ever here for ya---

DSCF5074We had company over on Saturday and just out of the blue, Sam came zooming in the room on his bike.  LOVE the glasses!

DSCF5073  He loves zooming around the big kitchen island  round and round!  With a smile like that, he can zoom all he wants.

DSCF5072

Sigh.  He sure makes up for his stinker-ness being so darned cute. ;)

Sam vacuuming 5-5-11

That and he’s such a good little slave helper, too! ;)

Then there’s this hottie---

DSCF5059 That’s right—he can be taught.  Kevin’s first time driving a tractor.  He was really enjoying digging up posts!  What a man!  He worked all day Saturday outside, mostly on trying to fix our sprinklers that aren’t working.  Thanks to Cindy and Warren for all their help, too!  We almost have a complete working sprinkler system! 

See ya next time!

Monday, May 09, 2011

Arabian Fruity Cake

Arabian Fruity Cake 5-6-11

When I went to Kansas in March to visit my dearly missed friends, one of the nights we got together, my friend Julie shared this cake with us.  This cake seems, should I say-homely, but let me tell you that it tastes fantastic.  It is easy to make with minimal ingredients and it is quite unique.   We could not come up with any idea why it is called Arabian Fruity Cake.  Julie has had this recipe since the early 70’s in a cookbook someone gave her while she was in college.  It is called The Campus Survival Guide by Jacqueline Wood (Feb. 1973).  If you want the cookbook, which also has a volume 2 as well, you can get it new from Amazon for only $129.00!  Oh, you can also get a number of used ones from Amazon for around $1.80!

This cake is made with whole wheat flour, wheat germ, honey and most interestingly, pureed canned fruit cocktail.  I made some ever-so-slight changes to the recipe, but mostly to make it easier and a little more 21st century friendly. ;)  The original recipes says to strain the fruit through a sieve by pressing it with a spoon.   Food processor all the way for me!

What really makes this cake taste so great is the brown sugar, butter-rich topping that the recipe even gives a warning in all caps for—DO NOT SERVE CAKE WITHOUT ITS TOPPING.  It says “their natural affnity for each other makes this the greatest!”  You’ve got to give this cake a try sometime!  It’s easy and really just has such a unique flavor (it doesn’t taste fruity at all)!  The header to the cake recipe also says “the flavor is subtly reminiscent of Arabian delights.”  I was not able to find anything on the internet that led to any Arabian desserts or cakes similar to this.

Arabian Fruity Cake, adapted from The Campus Survival Guide by Katrina, Baking and Boys!

1 cup whole wheat flour

1/2 cup wheat germ

1/2 cup honey

1/2 cup brown sugar

1 (14 1/2 oz.) can fruit cocktail, drained

1 large egg

1 teaspoon baking soda

pinch of salt

Preheat oven to 350 degrees.  Spray an 8x8 inch baking pan with cooking spray.

In the bowl of an electric mixer (though I’ve made the cake twice and once by hand) , mix together the whole wheat flour, wheat germ, honey and brown sugar.  Pulse the drained fruit cocktail in a food processor until smooth.  Add the pureed fruit to the other ingredients and mix well.  Add the egg, baking soda and salt and combine well.  Pour into the baking pan.   Bake for 30 minutes until golden brown and springy to the touch.  Cool on wire rack.   Serves 9.

TOPPING:

1/2 cup butter (I used Bestlife butter baking sticks)

1 cup brown sugar

2 teaspoons vanilla extract

1/2 cup evaporated milk (I used fat free)

Put all the ingredients in a small saucepan and melt together.  Stir over medium heat about 5 minutes, until thickened.

Serve each piece of cake smothered with topping (one or two tablespoonfuls), but add it to each individual piece.   Store leftover topping in the fridge.  It will thicken up when cold, but you can put some on top of a piece of cake and microwave it for 15-20 seconds and it will melt down over the cake perfectly.

DSCF5053   

Here is the chilling topping.  And the rather plain looking cake.  It tastes better than you imagine.

DSCF5031

Thanks for the fun recipe/cake, Julie!